Discover the Droid Depot to Build Your Own Droid
When booking my husband and my tickets to Hollywood Studios, I knew I had to discover the Droid Depot. I grew up watching the Stars Wars films and fantasized about having my own droid. So when Disney first announced the Droid Depot, of course, I had to do it to fulfill my fantasy!
In this blog post, I want to share my experience and knowledge about building a droid at Droid Depot, so you will know what to do when you visit the Droid Depot.
(Please note this is based on my experience when I went in February 2021).
Reservations for Droid Depot
If you are interested in building a droid, I recommend setting up a reservation. This is what I did. It is not required, but it will help secure you a spot. Reservations can be set 60 days in advance thru the Walt Disney World App or Walt Disney World’s website. You will need a credit card to set up the reservation. If you need to cancel your reservation, you have 1 day before your reservation to do so without any cost. If not, you will be charged $99.99(the cost of the droid) for each builder who is a no-show.
UPDATE- On Oct 15th, 2022, I noticed on WDW’s website that Disney increased the price of the droid to $119.99. So now that is how much you be charged for a no-show.
UPDATE APRIL 2024- Full payment for the droid is now required at the time of booking your reservation.
Keep in mind that the reservation is for the number of builders. Each builder is allowed to have one additional guest with them in the building area.
You can go inside the droid depot without having to build a droid. I highly recommend going inside and checking the place out because there is so much to see!
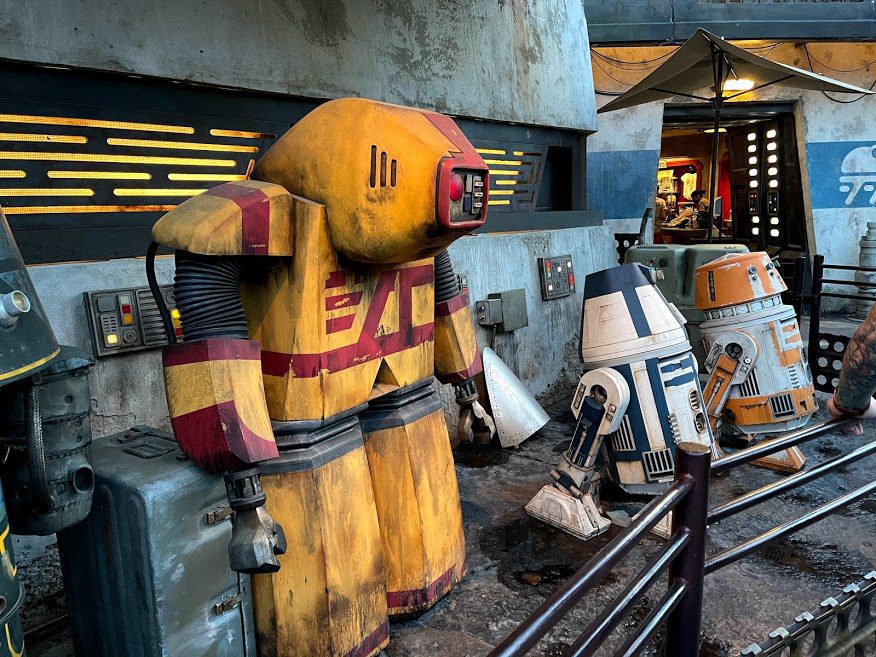
Droid Build Registration Desk
After you check-in at the main entrance, you will head to the Droid Build Registration Desk. When you first walk in, make sure you look all around! Definitely look up! You will see a conveyor belt of droid parts moving over your head! Disney did not lack in the details. The details of this place are superb with so many features in one area! I know I missed some details! Guess you can say another reason for me to head back!

You will see a wall or what I like to call a “menu” with the different part options for the BB-Series(Round Shape Droid) and R-Series( 3 legged Droid) as you head up to the desk. This will give you an idea of the options available for you to choose to build your droid. The wall allowed me to start planning on how I wanted to build my droid. I tend to be indecisive. Color selections include black, blue, orange, purple, red, and white.


Pricing
Once you get to the registration desk, you will need to decide which series you will like to build. Both are the same price of $99.99 plus tax.
UPDATE- On Oct 15th, 2022, I noticed on WDW’s website that Disney increased the price of the droid to $119.99.
When I was there in Feb 2021, they offered a bundle ($164.79 plus tax) where you get the Droid Carrying Backpack ($49.99) and a personality chip ($14.99) along with the droid. You cannot use any Disney discounts on the droid itself, but you can on the backpack and personality chip.
Personality Chips
There are six options for personality chips- 2 First Orders (Red and Black), 2 Resistances (Blue and Orange), and 2 Smugglers (Purple and Silver). The personality chips give your droid some extra spunk.
Each chip has its unique sounds, and there is a display case in which you can hear the different sounds of each chip. A friend mentioned that it was hard to listen to the sounds, and you only hear a small portion of the sound.
So I did my research on how each personality chip sounds before I went to the Droid Depot. I found this video on Youtube from The Dan-O Channel. Forward the video to the 20-minute mark because this is where he starts going into the different sounds of the personality chips. This video helped me decide on which personality chips I wanted to purchase. I ended up buying the Orange and the Silver.


If you do not purchase the personality chip, your droid will sound like R2D2 for the R-Series and BB8 for the BB-Series.
Building Your Droid
Once you pay, they will give you a basket with the blueprint of the unit you selected to help guide you with the parts you will need to gather. It also displays the different dome heads you can choose.

Then the fun begins! You will head over to the conveyor belt to collect your droid’s parts. Match the pieces to the images on your basket to help you see what you will need to gather. A cast member will be there to make sure you collect the correct parts, so you do not need to rush at this part.
R-Series Parts – body, side legs(taped together), center leg, and a dome(headpiece)
BB-Series Parts- dome(headpiece), a dome connection plate, body sphere( taped together), and motor
Once you select the parts, you will head over to the building station to make your droid come to life! A cast member will guide you through the steps on how to build your droid. There is also a blueprint for both series on how to put together your droid at the station.
With the R-Series, you will have to screw the two side legs into the body. You will use the electric screwdriver at your station. The center leg snaps in place at the bottom of the body, while the dome/headpiece twists onto the top.


The cast member will show you some additional accessory pieces you will need to add the finishing touches to your droid.
Color Options -Black, Blue, Red, Silver, and White

For the R-Series, you will have two side pieces that will snap to the side legs and the two front pieces that will snap in place on the front of the body.
Once your droid is activated, a cast member will show you the ins and outs of your droid. Finally, you get to test out your new droid.

Don’t forget to name your droid. I named mine R3-G3N1 aka Genie because he was inspired by one of my favorite Disney Characters, Genie. Click here to meet R3-G3N1.


Once you are finished, they will help you pack up your new friend so both of you can travel to see the rest of Baatu and Hollywood Studios!

Do not worry if you did not buy the backpack (Droid Backpack) because they will give you a box. This box will look like the one you receive at Build-A-Bear.
Additional Accessories
Additional accessories are available for you to purchase to help fully customize your droid. Options include decals, accessory panels, personality chips, blasters, jets, and a serving drink tray. They range from $7.99 to $17.99.
All of these accessories are for the R-Series except for the personality chips. Personality chips are for both BB and R-Series.
Both droids use 6 AA batteries, and the remote control uses 2 AA batteries.
Be sure to have your droid turned on with the remote control off so your new friend can interact/enjoy the world of Baatu along with you!

The fun with your droid does not end after leaving the park. It continues at home. Click here to find out how!
If you are heading over to Hollywood Studios, make sure you make plans to check out Droid Depot. Most definitely if you are a huge Star Wars fan! From the atmosphere, interaction, details, and a custom droid, you get a lot for your money ( if you decide to build a droid). Please remember, you do not have to build a droid to experience the Droid Depot.
I had a phenomenal experience. Without a doubt, I will do this experience again!
This blog post may contain affiliate links. This means that, at no additional cost to you, I will earn an affiliate commission if you click through the link and finalize a purchase.